In the manufacturing sector, aluminum alloy is the most often utilized nonferrous metal structural material. Its applications span numerous industries, including those involving flight, space travel, automobiles, machines, ships, and chemicals. In this article, mechanical polishing technology is used to achieve ultra-precision mirror processing of aluminum alloy mobile phone case, and the surface roughness Ra of aluminum alloy mobile phone case is 0 026 m machined surface.
Analysis of Ultra-Precision Mirror Processing Technology of Aluminum Alloy Mobile Phone Case
Basic principle of shot blasting Mechanical shot blasting is to add shot blasting fluid between the shot blasting disc and the workpiece under certain pressure and rotating speed, and remove the workpiece surface slightly under the mechanical action of fine abrasive particles, so as to achieve the ultra-precision mirror processing requirements on the workpiece surface. In this experiment, the ultra-precision mirror polishing technology was used to process the ultra-precision mirror surface of the aluminum alloy car body. The grinding principle is shown in Figure 1. At the initial stage of processing, the material to be processed is mainly in the form of grinding removal. The abrasive particles are ploughed and planed to remove the workpiece surface by folding and rolling; At the same time, under the proper pressure, the number of broken and blunt abrasive particles increases, the size decreases, the edges and corners become blunt, and the cutting effect gradually weakens. At this time, abrasive particles are mainly removed from the workpiece surface by friction grinding in order to fully reduce the roughness value of the machined surface. On this basis, the additives in the abrasive fluid form an adhesive film on the machined surface, the flatness of the workpiece surface is further improved, the size of the abrasive particles is further reduced and homogenized, and the abrasive particles and the adhesive film are integrated to form an abrasive film with excellent flatness, softness and uniformity, and the surface is removed by soft grinding, and the new surface and new adhesive film are alternately generated.
Cutting Amount of Aluminum Case Processing
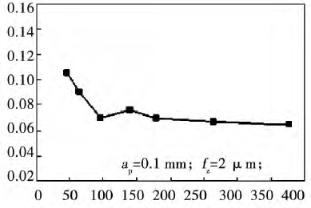
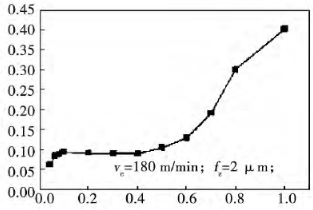
The influence of cutting speed of diamond end millingcutter on the end roughness is shown in the figure. It can be seen that the surface roughness will decrease with the increase of cutting speed. If the cutting speed is less than 180 m/min, the surface roughness will decrease significantly with the increase of cutting speed. When the cutting speed is greater than 180 m/min, the surface roughness will not be improved or improved. Therefore, aluminum alloy milling must be faster than 180 m/min. The relationship between axial cutting depth and end roughness is shown in Figure 9. With the increase of cutting depth, the roughness will increase, but the increasing trend of different intervals is different.

When the cutting depth is within 0.1~0.5mm, the surface roughness is almost constant. If the cutting depth is less than 0.1mm, the reduction of cutting depth will significantly reduce the surface roughness. When the cutting depth is greater than 0.5mm, the surface roughness increases very quickly. Therefore, when the axial cutting depth is within 0.1mm~0.5mm, the surface quality and efficiency of aluminum alloy milling can be considered. The relationship between the feed of each tooth and the end roughness is shown in the figure. When the feed rate of each tooth increases, the surface roughness will increase slowly, and the increase rate is less than the influence of the axial cutting depth. This is slightly different from the existing research conclusions. This may be because, through analysis, the selected feed range is small. When the feed range changes in a large range, the impact on surface roughness is obvious. This experiment mainly studies finish machining. The feed speed of finish machining should not be too high, but properly increasing the feed speed will not significantly increase the surface roughness.

The influence of dry and wet cutting conditions on the surface roughness of the workpiece is shown in Figure 11. As shown in Figure 11, the surface roughness of the workpiece processed by wet cutting method is less than that of dry cutting. Wet cutting can reduce the cutting temperature, improve the cutting performance and service life of the tool, and has the lubrication function to prevent the chip from sticking to the tool, and effectively inhibit the occurrence of chip species. Because the chips are more difficult to cut aluminum alloy, the chips that damage the surface integrity of the workpiece are often stuck on the workpiece, and the use of cutting fluid can effectively solve this problem.